
Blog
Find the Best Concrete Contractor in Huntertown, IN
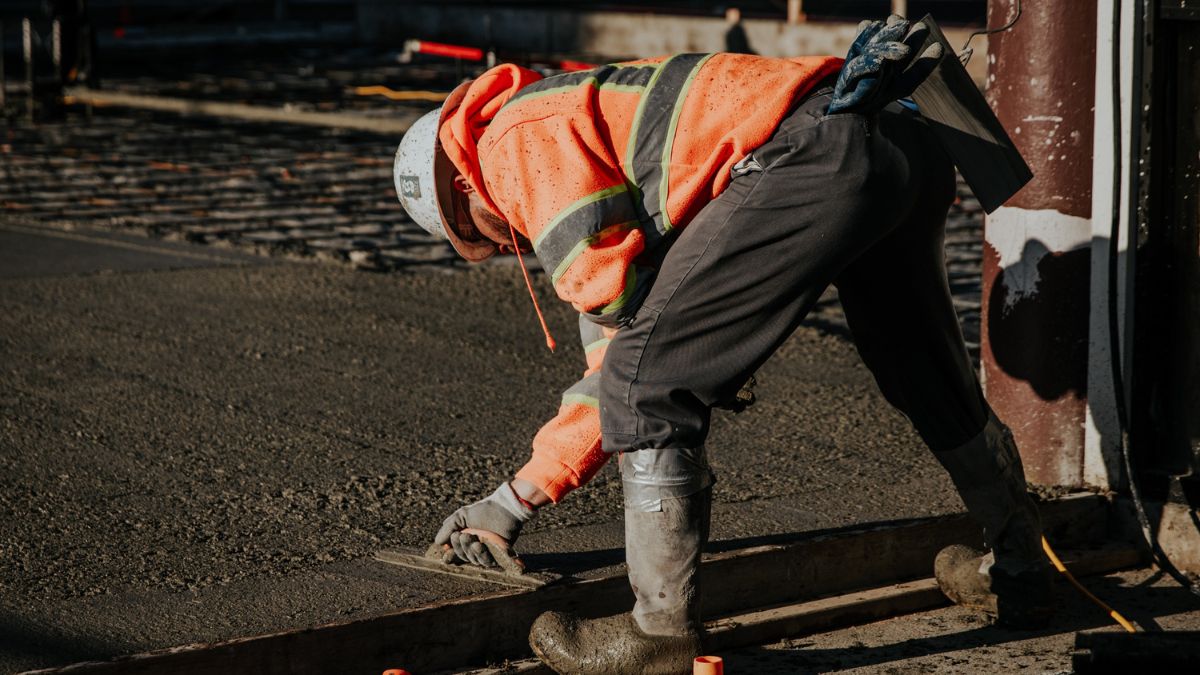
Choosing the right concrete contractor in Huntertown can make the difference between a beautiful, long-lasting investment and a costly mistake that haunts you for years. With numerous contractors serving the Allen County area, homeowners face the challenge of identifying professionals who understand local conditions and deliver quality results.
Huntertown’s unique position in northeast Indiana creates specific challenges for concrete work. The area’s clay-heavy soils and dramatic seasonal temperature swings require contractors with local expertise and proven track records. From managing harsh winter freeze-thaw cycles to addressing soil expansion issues common to the region, experienced contractors bring knowledge that protects your investment.
This guide will equip you with the tools needed to evaluate contractors effectively, ask the right questions, and avoid common pitfalls that lead to project failures. You’ll learn what separates professional contractors from unreliable ones and discover how to ensure your concrete project meets both your expectations and local building standards.
Understanding Huntertown’s Concrete Challenges
Climate and Weather Considerations
Huntertown experiences significant temperature variations throughout the year, with winter lows often dropping well below freezing. These freeze-thaw cycles can destroy improperly installed concrete through cracking, scaling, and structural failure. Professional contractors understand these climate realities and plan accordingly.
Spring brings rapid temperature changes and ground movement as soils respond to moisture level fluctuations. Contractors must time installations carefully and use appropriate concrete mixes designed for cold weather performance. They also employ techniques that prevent common weather-related problems like surface scaling and premature cracking.
Soil Conditions and Site Preparation
Allen County’s clay soils present unique challenges for concrete installations. These soils expand when wet and shrink when dry, creating movement that can crack concrete slabs without proper preparation. Experienced Huntertown contractors recognize these soil characteristics and implement appropriate foundation techniques.
Proper drainage becomes critical with clay soils since water accumulation undermines concrete foundations. Contractors should assess your property’s drainage patterns and incorporate solutions that prevent water-related problems. This includes proper grading, base material selection, and sometimes installing drainage systems to redirect water away from concrete surfaces.
Types of Concrete Services Available
Residential Applications
Concrete contractors in Huntertown typically offer comprehensive residential services including driveways, patios, sidewalks, and garage floors. Each application requires different approaches and considerations. Driveways must withstand vehicle loads and freeze-thaw cycles, while patios focus on creating attractive outdoor living spaces that complement your home’s architecture.
Foundation work represents a specialized area requiring contractors with structural knowledge and familiarity with local building codes. Basement floors, footings, and foundation walls demand precise installation techniques and appropriate reinforcement methods to ensure long-term structural integrity.
Decorative Concrete Options
Stamped concrete has gained popularity among Huntertown homeowners seeking premium aesthetics without the expense of natural stone or brick. This technique allows contractors to create surfaces that mimic expensive materials while providing concrete’s durability and low maintenance requirements.
Colored concrete, exposed aggregate, and textured finishes offer additional ways to enhance outdoor spaces. These decorative options require specialized skills and equipment, making contractor selection even more critical for achieving professional results that maintain their appearance over time.
Essential Qualities of Professional Contractors
Proper Licensing and Insurance
Legitimate concrete contractors in Huntertown should carry appropriate licensing for construction work in Indiana. This includes state contractor licenses and local permits as required by Allen County regulations. Always verify licensing status through official channels before hiring any contractor.
Comprehensive insurance protection shields both you and the contractor from potential problems. Contractors should carry general liability insurance and workers’ compensation coverage. This protection prevents you from facing liability if accidents occur during construction or if work fails to meet agreed-upon standards.
Local Experience and References
Contractors with established Huntertown experience understand local conditions, building codes, and material suppliers. They’ve developed relationships with concrete suppliers who provide appropriate mixes for regional climate conditions and soil types.
Request references from recent projects and contact previous customers directly. Ask about work quality, timeline adherence, cleanup practices, and overall satisfaction. When possible, visit completed projects to assess workmanship quality firsthand and see how the concrete has performed over time.
Equipment and Crew Capabilities
Professional concrete contractors invest in proper equipment including mixers, finishing tools, and safety equipment. They maintain backup equipment for larger projects and employ skilled crews experienced in various concrete applications.
Evaluate potential contractors’ equipment inventory and crew size. Larger projects may require multiple crew members working in coordination, while decorative work demands specialized tools and experienced craftspeople capable of executing complex techniques with precision.
Critical Questions for Potential Contractors
Project-Specific Inquiries
Begin conversations by discussing your specific project requirements in detail. Experienced contractors should ask comprehensive questions about intended use, aesthetic preferences, and budget considerations. They should also assess site conditions and discuss potential challenges upfront rather than discovering them mid-project.
Request detailed written estimates that include material specifications, labor costs, and timeline expectations. Compare estimates carefully, noting differences in materials, techniques, or scope that might explain price variations between contractors.
Process and Timeline Discussions
Understanding each contractor’s work process helps you evaluate their professionalism and planning capabilities. Ask about site preparation procedures, concrete mix specifications, and quality control measures they employ during installation.
Timeline discussions should include weather contingencies and coordination with other trades if applicable. Professional contractors provide realistic schedules and communicate proactively about potential delays or necessary adjustments to keep projects on track.
Warranty and Follow-Up Services
Reputable contractors stand behind their work with comprehensive warranties covering both materials and workmanship. Understand what warranty coverage includes and how long protection lasts for different types of concrete work.
Inquire about follow-up services like sealing applications for decorative concrete or maintenance recommendations for long-term performance. Contractors who provide ongoing support demonstrate commitment to customer satisfaction beyond initial installation.
Red Flags to Avoid
Door-to-Door Solicitation
Exercise extreme caution with contractors who appear at your door offering concrete services. Legitimate contractors rarely need to solicit work door-to-door since they typically maintain steady customer bases through referrals and repeat business from satisfied customers.
These contractors often use high-pressure sales tactics or claim they have extra materials from nearby jobs. They may demand immediate decisions or large upfront payments. Always take adequate time to research contractors thoroughly regardless of their initial approach or claims of urgency.
Suspiciously Low Bids
While competitive pricing attracts attention, extremely low bids often indicate corner-cutting that leads to poor results. Contractors might use inferior materials, skip proper site preparation, or lack appropriate insurance coverage to achieve unrealistic pricing.
Quality concrete work requires investment in proper materials, skilled labor, and appropriate equipment. Contractors who significantly underbid legitimate competitors often cannot deliver acceptable results within their proposed budgets without cutting corners that compromise quality.
Lack of Local Presence
Contractors without an established local presence may not understand Huntertown’s specific conditions or building requirements. They might lack relationships with local suppliers or inspectors, potentially causing delays or compliance issues that extend project timelines.
Verify business addresses, local references, and established customer bases before hiring contractors from distant locations. Local contractors have reputations to maintain and remain accessible to address any issues that arise after project completion.
The Professional Installation Process
Initial Consultation and Planning
Professional contractors begin projects with thorough consultations that include comprehensive site assessment, requirement discussions, and design planning. They should explain different options, material choices, and cost implications clearly and patiently, answering all your questions.
Detailed project planning prevents misunderstandings and ensures all parties understand scope, timeline, and expectations. Contractors should provide written proposals that specify materials, techniques, and completion criteria in detail, leaving no room for confusion.
Site Preparation and Excavation
Proper site preparation forms the foundation of concrete success. This includes excavation to appropriate depths, soil stabilization if needed, and base material installation. Contractors should explain their preparation process and address any site-specific challenges they identify.
Utility marking and protection is essential before excavation begins. Professional contractors coordinate with utility companies and take precautions to prevent damage to existing infrastructure like gas lines, electrical cables, or water pipes that could create dangerous and expensive problems.
Concrete Placement and Finishing
The actual concrete placement requires careful timing and coordination. Contractors should monitor weather conditions and adjust schedules accordingly. They coordinate concrete delivery, placement, and finishing to ensure consistent results across the entire project area.
Finishing techniques vary depending on project requirements. Basic applications might need simple float finishes, while decorative work requires specialized stamping or texturing procedures performed within specific time windows as the concrete cures.
Cost Considerations and Budget Planning
Factors Affecting Project Costs
Several factors influence concrete project costs in Huntertown. Site accessibility affects equipment requirements and labor needs. Soil conditions might require additional preparation or specialized base materials. Project complexity increases costs through specialized techniques or decorative elements.
Material costs fluctuate based on concrete prices, reinforcement requirements, and decorative elements. Labor costs vary depending on project complexity and timeline requirements. Understanding these factors helps you evaluate contractor proposals accurately and make informed decisions.
Payment Schedules and Protection
Reputable contractors typically request minimal upfront payments, with the majority of payment due upon satisfactory completion. Be suspicious of contractors demanding large down payments or full payment before work begins, as this often indicates financial instability or fraudulent intent.
Document all agreements in writing and maintain detailed payment records. Many states provide mechanic’s lien protections, but proper documentation helps prevent disputes and ensures legal protections remain in place throughout the project duration.
Maintenance and Long-Term Care
Protecting Your Investment
Proper maintenance extends concrete life and maintains appearance for decades. Contractors should provide specific maintenance recommendations tailored to your installation type and local climate conditions, helping you protect your investment.
Sealing applications protect decorative concrete from moisture penetration and freeze-thaw damage. Regular cleaning and prompt repair of minor cracks prevent more serious problems from developing over time, saving money on major repairs.
Addressing Common Issues
Even properly installed concrete may develop minor issues over time due to natural settling and weather exposure. Experienced contractors provide guidance on addressing common problems like surface staining, minor cracks, or slight settling.
Understanding normal concrete behavior helps you identify when professional attention is needed. Contractors should explain what constitutes normal aging versus problems requiring repair or warranty coverage, giving you confidence in managing your concrete surfaces.
Making Your Final Decision
Selecting the right concrete contractor in Huntertown requires careful evaluation of multiple factors beyond just price. Quality concrete work represents a significant investment that affects your property for decades, making contractor selection crucial for long-term satisfaction.
Take adequate time to interview multiple contractors, check references thoroughly, and verify licensing and insurance coverage. Compare proposals carefully, looking beyond price to consider materials, techniques, and contractor qualifications that indicate their ability to deliver quality results.
Remember that the lowest bid rarely represents the best value. Invest in contractors who demonstrate knowledge, professionalism, and commitment to quality results. This investment pays dividends through beautiful, durable concrete surfaces that enhance your property’s value and your family’s enjoyment for years to come.
Contact Info:
Name : Crystal Creek Concrete
Address : 20952 Ward Rd, Woodburn, IN 46797
Phone: +1 (260) 241-4936
Email: loren@crystalcreekconcrete.com
Website: https://crystalcreekconcrete.com/

Hoodies are no longer just a comfortable garment they have evolved into a full lifestyle statement. Across the United States, hoodies have become a defining fashion item for an entire generation of young, style-conscious individuals. Celebrities, influencers, and a thriving streetwear culture have all played their part in making hoodies one of the most desirable pieces in modern fashion. They are flexible, comfortable, and endlessly stylish, capable of carrying both a casual and fashion-forward look with equal ease. Hoodie sales across the American fashion market have grown remarkably over the past few years, and demand shows no signs of slowing down. Among all the brands competing for attention, Saint Vanity stands out through its exceptional designs and commitment to quality. Their hoodies have become a symbol of the new streetwear culture while remaining genuinely accessible to everyday shoppers across the USA.
Why Saint Vanity Leads Style
The Saint Vanity hoodie has rapidly established itself as a standout piece in American streetwear fashion. The brand focuses on creating clothing that is both practical and visually compelling, drawing in a wide and loyal customer base. Shoppers love the soft fabrics, relaxed fits, and on-trend colour options that transform even a simple outfit into something stylish and intentional. Influencers across social media platforms regularly feature Saint Vanity pieces in their content, amplifying the brand’s reach and cultural presence with every post. The brand offers oversized, cropped, and zip-up styles, giving customers meaningful choices that reflect their own personal aesthetic. These hoodies pair effortlessly with joggers, jeans, or sneakers, which is exactly why so many people reach for them as their go-to everyday wear. This ability to merge comfort with style is precisely what positions Saint Vanity at the forefront of US streetwear culture.
Comfort Meets Streetwear Fashion
What truly sets Saint Vanity hoodies apart is the way they deliver genuine comfort and real fashion without ever forcing you to choose between the two. The materials are warm, durable, and well constructed, ensuring wearers feel at ease across all seasons and settings. Unlike basic hoodies, these garments are built with contemporary fits and thoughtful design details throughout. The oversized style is particularly beloved, offering a sense of warmth paired with that effortlessly cool streetwear silhouette. At the same time, the cropped versions provide a sleek and stylish option for those who prefer a cleaner, more fitted look. Every design is built around functional fashion, ensuring that wearers stay stylish without sacrificing the everyday comfort they need. This is the balance that keeps Saint Vanity growing season after season. Also, check Hellstar Clothing at the Official Store.
Why US Buyers Love Them
The Saint Vanity hoodie collection has seen steadily rising demand as streetwear continues to cement itself at the heart of American fashion culture. US buyers appreciate clothing that is lightweight, comfortable, and versatile enough to handle the pace of daily city life. Saint Vanity meets this demand precisely, offering pieces that work just as well as a daily essential as they do as a fashion statement. A large number of customers across the country reach for these hoodies when heading to class, commuting to work, or travelling between cities. The quality materials used in each hoodie ensure longevity, making every purchase a genuinely worthwhile investment. Social media exposure and endorsements from well-known lifestyle figures have further driven demand among younger American audiences. For all these reasons, Saint Vanity hoodies are fast becoming a wardrobe essential for buyers right across the United States.
Different Styles for Everyone
One of Saint Vanity’s greatest strengths is the breadth of hoodie styles available across its collection. The oversized hoodie remains a consistent bestseller, particularly among those who prefer a relaxed, lived-in fit that still looks intentional. The cropped hoodie offers women a playful and fashionable alternative that pairs beautifully with high-waisted pieces. The graphic hoodie caters to those who want something bolder and more visually expressive in their wardrobe. Meanwhile, the classic zip-up hoodie provides practical versatility, adapting comfortably to any weather condition or occasion. Every style is designed with care, balancing comfort with the demands of modern fashion. The range is wide enough that there is genuinely a Saint Vanity hoodie to suit every personality and preference.
Influence of Celebrities and Trends
Celebrities and influencers regularly wearing Saint Vanity hoodies have given the brand strong cultural relevance across the country. They have been spotted styled by well-known figures on casual outings, at the gym, and during airport appearances that find their way onto millions of feeds. Their visibility on Instagram and TikTok has made them even more appealing to younger audiences who look to digital culture for style direction. Fashion trends in the modern era frequently begin within influencer communities, and Saint Vanity has positioned itself perfectly within that space. People are consistently impressed by how easily these hoodies can be styled, whether worn with joggers, jeans, or shorts. The brand has embedded itself in the fast-moving digital fashion landscape that now shapes what people wear and how they wear it. This association with cultural figures and online trends is what makes Saint Vanity hoodies iconic in American street fashion.
Final Thoughts on Saint Vanity
Saint Vanity has built a brand identity rooted in comfort, style, and genuine cultural relevance. Their hoodies represent everything that modern fashion enthusiasts look for in everyday streetwear. The US market has embraced them wholeheartedly because of the perfect balance they strike between quality construction and trend-aware design. With oversized, cropped, zip-up, and graphic options all available, the collection truly has something for everyone. Their continued rise is a testament to the power of authentic streetwear culture and the influence of social media in shaping modern consumer habits. Choosing a Saint Vanity hoodie is an investment in fashion that is both timeless and consistently relevant. To the American shopper, these hoodies are more than just clothing they represent a lifestyle and a modern sense of identity.

Caring for a loved one during an illness or in their final years is both an act of love and a profound responsibility. For families who have spent months or years as caregivers, the passing of a loved one can bring a mix of relief, guilt, and deep grief. The transition from caregiving to grieving is often more complex than expected. Families not only face the emotional weight of loss but also practical considerations, from medical equipment to funeral arrangements. Understanding how to navigate this transition can make the process more manageable, compassionate, and ultimately healing. During the difficult transition from caregiving to grieving, many families rely on DME companies in Arlington Texas, to help return rented equipment, arrange pickups, or guide them on what to do with medical supplies that are no longer needed.
The Emotional Shift: From Caregiver to Bereaved
For caregivers, the daily routine often revolves around the needs of the loved one. This can include administering medications, managing appointments, assisting with mobility, and providing emotional support. When that responsibility ends due to death, caregivers may feel an unexpected void. Many experience what psychologists call “role loss,” where the sudden absence of caregiving tasks leaves them unsure of their identity or purpose.
It’s important for families to acknowledge this shift. Grief can show up in many ways, including sadness, anger, anxiety, and even relief. Experiencing a combination of emotions is normal, and understanding that these feelings are part of a natural process can help families begin to navigate this transition with less self-judgment. As families move from caregiving to grieving, finding a cheap cremation near me can provide an affordable and respectful option for handling a loved one’s final arrangements while easing the financial and emotional burden.
Practical Considerations: Medical Equipment and Home Care
One of the first challenges families face after a loved one passes is managing medical equipment. Durable Medical Equipment (DME), such as hospital beds, wheelchairs, oxygen tanks, or walkers, often becomes unnecessary once caregiving ends. Families may wonder what to do with these items.
Many DME stores provide guidance for returning, donating, or repurposing equipment. Some hospitals and home health agencies also have programs for safely collecting and redistributing used equipment to others in need. Addressing this step not only clears physical space but can also provide a sense of closure for families transitioning out of a caregiving role.
Planning Cremation and Funeral Services
Funeral and cremation services play a critical role in helping families process their loss. Planning these services allows families to honor their loved one’s life and create a tangible space for mourning. Whether choosing cremation or a traditional funeral, families often encounter decisions about service type, location, and memorialization options.
Cremation services provide flexibility, allowing families to plan memorials that reflect the personality and wishes of the deceased. For some, scattering ashes in a meaningful location or keeping them in a personalized urn helps continue a connection with their loved one. Traditional funeral services, on the other hand, provide structured opportunities for communal grieving, offering support from friends, family, and the broader community.
Professional funeral directors guide families through these choices with sensitivity, helping them navigate the logistics while also addressing emotional needs. This guidance can lessen some of the stress of planning, allowing families to focus on grieving and honoring their loved one.
The Role of Support Networks
Transitioning from caregiving to grieving is not something families need to face alone. Support networks, both formal and informal, play a vital role in emotional adjustment. Support groups, counseling, and faith-based communities provide spaces to share experiences, validate feelings, and receive comfort.
Peer support is particularly valuable for former caregivers. Talking to others who have navigated the same transition can reduce feelings of isolation and help normalize complex emotions like guilt or relief. Professional grief counselors can also provide coping strategies, assist in managing grief-related stress, and help families adjust to life after caregiving.
Creating Rituals and Memories
Rituals, both large and small, can help families process grief and honor the legacy of their loved one. Simple gestures such as lighting a candle, creating a memory book, or holding a private remembrance ceremony provide opportunities for reflection and emotional expression.
Incorporating items or spaces connected to the loved one’s photographs, favorite possessions, or even parts of the home where they spent time can help families maintain a connection while also acknowledging the new reality. These rituals often provide comfort, helping families shift from caregiving responsibilities to grieving in a healthy and meaningful way.
Self-Care During the Transition
Amid the emotional and practical demands of this period, self-care is essential. Former caregivers may neglect their own needs as they adjust to life without caregiving duties. Prioritizing rest, nutrition, social connection, and physical activity can help stabilize emotions and prevent burnout.
Mindfulness practices, journaling, and meditation can also provide outlets for processing grief. Even brief daily routines that promote well-being, like a short walk, a cup of tea, or connecting with a supportive friend, can make a meaningful difference in managing the emotional load.
Long-Term Perspective: Adapting to Life After Loss
The transition from caregiving to grieving is not a linear process. Some days may feel manageable, while others may bring intense waves of sadness. Recognizing that grief evolves over time can help families be more patient with themselves.
Over time, the focus may shift from immediate mourning to integrating the loss into everyday life. Maintaining connections with others, participating in meaningful activities, and cherishing memories of the loved one help foster resilience and healing. Professional support, whether through counseling, support groups, or spiritual guidance, can remain an important resource even months after a loss.
Conclusion
The journey from caregiving to grieving is a profound and multifaceted experience. It encompasses emotional adjustments, practical decisions, and a redefinition of daily life. DME stores, funeral homes, and cremation services all play essential roles in this process, providing both logistical support and spaces for meaningful reflection.
Acknowledging the emotional complexities, seeking support, and creating rituals for remembrance help families navigate this transition with compassion and resilience. While grief is deeply personal and unique to each individual, understanding the steps involved and accessing available resources can make the process more manageable. In time, families may find that the love and care they provided as caregivers continue to influence their healing, leaving a lasting legacy of devotion and connection.

Stubborn damage by water disrupts homes and demands professional attention after sudden leaks. Homeowners might worry about structural harm and safety costs within their home spaces. However, timely professional help and durable solutions safeguard properties from serious damage and costly repairs. Wise property management prevents expensive repairs and keeps buildings stable after water events each year.
Trusted partners, such as Steamatic water damage restoration, offer reliable recovery support for homes and businesses through their rapid responses. Teams like them use advanced tools and efficient tactics to restore safety fast with care. Property owners search for quick relief and comprehensive guidance after sudden damage. This article outlines key moments when swift action saves valuable property from severe damage.
Right After A Flood Hits
Floodwater generally invades homes within minutes after heavy rain or a river surge without prior notice. Drywall, wood, and carpet absorb moisture fast and get damaged, which spreads from room to room across the house. In this situation, a fast response from trusted technicians can limit loss and protect the structure from severe harm. They utilize advanced pumps to remove pooled water before it seeps deeper into floors and wall cavities.
Quick extraction by experts prevents long-term structural decay and reduces odors within the frame structure that supports the roof. These teams assess electrical risk and secure the area before full restoration work begins. Such attention to detail can save documents, furniture, and family keepsakes from damage. Swift service means lower repair costs and less stress for homeowners after a flood or harsh storm.
Hidden Moisture Behind Walls
Through seepage, water can hide under floors or behind walls in any room. Damp, dark spaces are ideal for mold and bacteria growth within days inside the structure. Efficient restoration crews utilize meters to detect trapped moisture pockets that cannot be seen with the naked eye. Such advanced tools identify troubles before odors or stains appear on surfaces across the house.
Experts use dehumidifiers and air movers to remove moisture and restore safe humidity levels indoors after water intrusion. Without a timely professional inspection, hidden damp areas can weaken studs and subfloor supports within a few days. A minute review reduces the chance of mold spreading in storage areas like closets. Such a proactive approach protects indoor air quality, which saves the overall health of every member of the household.
After A Burst Pipe Or Appliance Leak
A burst pipe can be a nightmare for homeowners, as it can release gallons of water in a short span. Laundry machines can also cause trouble when a hose suddenly breaks and water floods parts of the house. Water can easily travel beneath baseboards and saturate insulation inside wall cavities. Here comes the importance of professional damage restoration, which limits the hidden destruction across the property.
Professional teams like Steamatic of Red River Valley close water sources and begin extraction. Fast intervention can save cabinets, trim, and interior finishes from future replacements, which ultimately saves homeowners money. Also, the professionals document damage for insurance claims and provide clear reports for adjusters after the incident. Such a thoughtful approach helps owners gain relief once the crisis comes under control through prompt expert care.
Before Mold Takes Hold
Mold and mildew can develop within forty-eight hours after water exposure in damp areas, if left untreated. Once this fungal growth takes place, surfaces stain and emit odors that linger throughout the home. Its spores spread through air ducts and get stuck on walls, fabrics, and wood across the whole interior. Advanced restoration prevents moisture at its source before mold expands into nearby areas.
Efficient teams disinfect and clean the affected areas with approved antimicrobial products to ensure a safe indoor ambience. They remove contaminated materials that cannot return to a safe state again, after prolonged water exposure. Fast action reduces health risks for pets, children, and older adults within the household. Prompt response from trusted agencies preserves both property value and health after a sudden leak.
Structural Materials At Risk Of Warp
Support beams and wood floors absorb water fast and may warp after a flood event. Metal fasteners rust, which weakens joints that hold walls and floors together. Structures like drywall lose strength once saturated and can crumble under light pressure within a short time span. To save these materials, a thorough restoration plan is the key, which addresses each compromised material with expert skill.
In terms of safety, the experts monitor moisture levels until materials reach safe standards set by industry experts. Structural repairs then restore stability and extend the life of the property. Such comprehensive support helps preserve resale value and protects long-term investment for property owners. Swift and timely support can make a true difference between repair and total loss after severe damage.
Damage due to water can change the feel of a home a lot faster than you expect. Delays or hesitation might cause deeper trouble that affects comfort and property value. Rely on renowned solutions like Steamatic water damage restoration, which offer help when sudden loss threatens stability. So, call a trusted local team and restore comfort before problems escalate faster.
-

 Blog7 months ago
hanime1: The Ultimate Destination for Anime Lovers
-

 Entertainment9 months ago
Sflix: How It’s Changing the Way We Watch Movies and TV Shows
-

 Entertainment8 months ago
Crackstreams 2.0: The Future of Free Sports Streaming?
-

 Bills10 months ago
Why Does My Instagram Reel Stop Getting Views After One Hour? How to Fix It?
-

 Technology10 months ago
Simpcitt: The Rise of a Unique Online Community
-

 Blog8 months ago
Imginn: The Ultimate Tool to View Instagram Content Anonymously
-

 80s10 months ago
Favorite 100 Songs of the 80s: (#1) Michael Jackson – Billie Jean
-

 Blog10 months ago
Simpcitu: The New Age Trend Shaping Online Interactions