
BLOG
Top 5 Milling Tools Every CNC Shop Should Keep on Hand

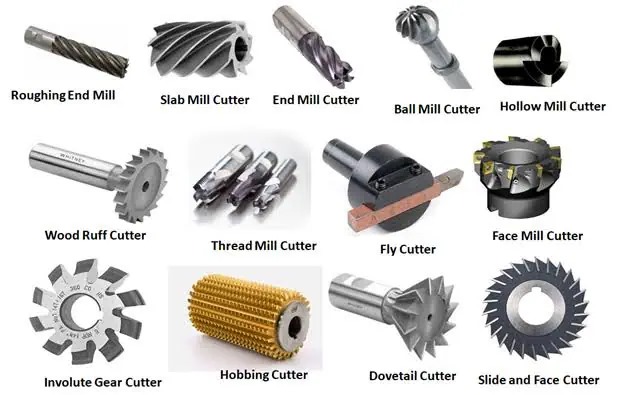
Running a CNC shop requires precision, adaptability, and the right tools for the job. Whether you’re machining aluminum prototypes or producing hardened steel components, the efficiency and quality of your work depend heavily on your tooling setup. With so many milling tools available, it’s easy to go overboard—or overlook essentials.
To help you streamline your operations and boost productivity, we’ve rounded up the top five must-have tools for any CNC machine shop. These tools cover a range of functions, from cutting to finishing, and are staples for most machining projects. Plus, we’ll cover what to avoid so you can minimize mistakes and maximize output. Start by checking your tool rack for high-performance collets—they might be the most underrated piece in your shop.
Start with the Basics
Before diving into niche cutters and specialized tooling, make sure you’ve got the foundational tools covered. Here are five staples every CNC shop should stock:
1. End Mills
No CNC milling operation is complete without a range of end mills. These versatile tools handle everything from slotting to contouring. Keep various types on hand, including:
- Flat end mills for sharp corners and edge cutting
- Ball nose mills for 3D contouring and complex geometry
- Corner radius end mills for added strength and reduced chipping
Choose different flute counts depending on the material—fewer flutes for aluminum, more for steels.
2. Face Mills
When you need to quickly remove material from large surface areas, a face mill is the go-to. These tools deliver a clean, flat finish and are ideal for prepping stock for secondary operations. They also help maintain part squareness when machining blocks or plates.
3. Thread Mills
Unlike traditional taps, thread mills cut threads with greater control and flexibility. You can use a single tool to create both internal and external threads, in left- or right-hand orientation. They’re especially useful when machining tough materials or threading blind holes. Every shop should have a few high-quality threadmills in standard sizes to reduce tool changes and minimize breakage risk.
4. Chamfer Tools
Chamfering isn’t just for looks—it’s critical for deburring, prepping holes for fasteners, and ensuring safe part handling. Chamfer tools are inexpensive, long-lasting, and take up minimal space in your tool carousel.
5. Spot and Center Drills
These short, rigid tools help ensure your subsequent drills don’t wander. By starting your holes with a center drill, you’ll improve the accuracy of your hole placement—especially when working on curved or angled surfaces.
Of course, your tool library isn’t complete without considering how you hold each tool. The wrong holding method can lead to runout, chatter, or even tool breakage. Precision lathe tooling and modular holders are essential for maintaining repeatability in turning applications, just as toolholders and collets are in milling.
What to Avoid
Having the right tools is only half the equation. You also need to avoid common pitfalls that can compromise part quality, tool life, and safety:
1. Using the Wrong Tool for the Material
Not all tools are created equal—some coatings and geometries are optimized for aluminum, others for hardened steel. If you use the wrong combination, you’ll see faster wear, chatter, and poor finishes.
2. Skipping Tool Maintenance
Dirty tools or worn-out holders can lead to inconsistent cuts and dimension errors. Regularly inspect and clean your collets, especially when machining dusty or abrasive materials. Investing in reliable collets and replacing them when worn is a low-cost way to keep everything running smoothly.
3. Not Standardizing Tool Libraries
Using too many similar tools wastes space and increases setup time. Standardize your tooling by choosing a few trusted brands and sizes that work across most jobs. This makes CAM programming and job setups faster and more reliable.
4. Overlooking Toolholding Fit
Tool deflection and poor surface finish often come down to poor toolholding practices. Use tight-tolerance holders and always select the shortest tool possible for your cut to reduce vibration.
Final Thoughts
No two shops are alike, but these five milling tools form the backbone of nearly every successful CNC operation. Keeping your tool cart stocked with reliable end mills, threadmills, face mills, chamfer tools, and center drills ensures you’re ready for just about any job. Combined with precision lathe tooling and a well-maintained collet system, your shop can stay ahead of production demands while delivering consistent quality.

Wood is one of the most versatile materials used in home improvement, construction, and DIY projects. From building outdoor structures to creating custom furniture, the type of wood selected can affect strength, durability, appearance, and overall performance. Winnipeg homeowners should consider the purpose of each project, local weather conditions, and the intended use of the finished product when choosing lumber or plywood. Here are six home projects where selecting the right wood matters most.
1. Completing DIY Woodworking Projects With Star Building Materials
DIY woodworking projects can include workbenches, storage units, planters, wall features, shelving, and decorative pieces. The materials used can influence how easy the project is to build and how well it holds up over time. Factors such as thickness, strength, grain, and surface finish should be considered before purchasing wood.
Homeowners looking for lumber in Winnipeg can compare different lumber and plywood options based on the requirements of their project. Star Building Materials can also be considered when exploring materials for woodworking and home improvement projects. Selecting wood that matches the project’s design and intended use can make construction easier and contribute to a better finished result.
2. Building a Deck or Outdoor Structure
Decks, sheds, fences, and other outdoor structures are exposed to Winnipeg’s changing weather conditions throughout the year. Rain, snow, sunlight, moisture, and temperature changes can all affect wood over time.
When selecting materials for an outdoor project, homeowners should consider durability, moisture resistance, structural strength, and maintenance requirements. Resources such as Windsor Plywood Sherwood Park can also be useful when researching wood products and comparing materials for different construction needs. Choosing an appropriate type of wood can help an outdoor structure remain functional and attractive for longer.
3. Building or Renovating Cabinets
Cabinets are frequently exposed to moisture, spills, cleaning products, and everyday use. Choosing suitable wood or plywood can therefore make a significant difference in their durability and appearance.
Homeowners should consider the cabinet’s location, expected use, desired finish, and maintenance requirements. The right material can provide a balance between strength, appearance, and practicality.
4. Constructing Shelves and Storage
Shelves need to support the weight of books, tools, household supplies, and other belongings. Using wood with the appropriate thickness and strength can help prevent sagging and improve the lifespan of a storage project.
Plywood and lumber can both be useful depending on the design and load requirements. Homeowners should consider dimensions, support spacing, finish, and the weight the shelving is expected to carry.
5. Framing Walls and Home Improvements
Lumber is an important component in wall framing, partitions, room additions, and various home improvement projects. Structural applications require materials that are appropriately sized and suitable for the intended purpose.
Before starting a framing project, homeowners should understand the project’s requirements and select lumber accordingly. Proper material selection can contribute to a stable and durable structure.
6. Creating Wood Furniture
Wood can be used to create tables, benches, desks, shelving units, and other furniture. Different types of wood can vary in strength, appearance, weight, and workability.
Consider how the furniture will be used and how much wear it will receive. Choosing suitable wood can help create furniture that is both functional and visually appealing.
Making Better Wood Choices for Home Projects
Choosing the right wood can affect the durability, appearance, and performance of almost any home project. By considering the project’s purpose, location, expected use, moisture exposure, structural requirements, and maintenance needs, Winnipeg homeowners can make more informed decisions when purchasing lumber and plywood.

A shoulder injury can affect everyday activities such as working, exercising, sleeping, lifting, and reaching. Recovery can also vary depending on the type and severity of the injury. Taking a proactive approach to your health can help you understand your condition, follow appropriate care, and gradually return to normal activities. Here are seven ways to better manage your health after a shoulder injury.
1. Get a Proper Medical Assessment With Kevin Kruse
Persistent shoulder pain, weakness, limited movement, or discomfort after an injury should be evaluated by a qualified healthcare professional. A proper assessment can help identify the underlying problem and determine which treatment options may be appropriate.
For people dealing with significant shoulder damage, surgery for a rotator cuff tear may be considered depending on the severity of the injury and other individual factors. Consulting a specialist can help patients understand their condition, available treatment approaches, and what recovery may involve.
2. Follow Your Recommended Treatment Plan
Once your condition has been assessed, following the recommended treatment plan is an important part of managing recovery. Depending on the injury, care may involve rehabilitation, medication, activity modifications, or other medical treatments.
Patients researching their healthcare options may come across resources such as Timely Medical | Timely Surgery at Affordable Prices when exploring accessible medical services. Regardless of the provider, patients should understand their treatment recommendations and communicate with their healthcare team if they have concerns or questions.
3. Give Your Shoulder Time to Recover
Trying to return to strenuous activities too quickly can place additional stress on an injured shoulder. Depending on professional recommendations, it may be necessary to temporarily modify activities that involve heavy lifting, repetitive movements, or overhead reaching.
Allowing adequate recovery time can help prevent unnecessary strain while the shoulder heals. Gradually returning to normal activities is generally preferable to pushing through significant discomfort.
4. Participate in Appropriate Rehabilitation
Rehabilitation may play an important role in restoring shoulder movement, strength, and function. A healthcare professional or physical therapist can recommend exercises based on the type of injury and stage of recovery.
Following an appropriate rehabilitation program consistently can help support gradual improvements. However, exercises should be performed according to professional guidance rather than attempting demanding movements too soon.
5. Pay Attention to Changes in Your Symptoms
Monitoring your symptoms can help you recognize how your recovery is progressing. Pay attention to changes in pain, swelling, mobility, weakness, or other unusual symptoms.
If symptoms become significantly worse or new concerns develop, speak with a healthcare professional. Keeping track of changes can also make it easier to communicate useful information during follow-up appointments.
6. Adjust Daily Activities and Work Habits
Simple changes to daily routines can help reduce unnecessary strain on an injured shoulder. Depending on your condition, this may involve modifying how you lift objects, carry items, reach for things, or position your shoulder while sleeping.
People returning to work should also follow appropriate recommendations regarding physical tasks and workplace activities.
7. Maintain Overall Health During Recovery
Good sleep, balanced nutrition, adequate hydration, and appropriate physical activity can support overall health while recovering from an injury. Maintaining healthy habits can also help you stay consistent with your recovery routine.
The goal is to remain active in ways that do not place unnecessary stress on the injured shoulder. Patience and consistency can be important throughout the recovery process.
Taking a Practical Approach to Shoulder Recovery
Managing a shoulder injury involves more than addressing pain alone. Getting an appropriate assessment, following treatment recommendations, allowing time to recover, participating in rehabilitation, monitoring symptoms, adjusting daily activities, and maintaining overall health can all support a more informed recovery process.

Summer can be a practical time for homeowners to plan window renovation projects. Warmer temperatures and longer days make it easier to schedule installation work and address areas of the home that may need improvement before winter arrives. Since Winnipeg homes experience significant seasonal changes, choosing windows based on efficiency, durability, comfort, and appearance can make a noticeable difference. Here are some important features to consider when planning a summer window renovation.
1. Energy-Efficient Window Options With Korsun Windows
Energy efficiency is an important consideration when upgrading windows. Well-insulated windows can help limit heat transfer, keeping rooms more comfortable during the summer while reducing heat loss when temperatures drop in winter. When comparing window replacement Winnipeg options, homeowners should look at features such as multiple-pane glass, insulated frames, and quality seals. These features can improve window performance and may help reduce unnecessary energy use. Korsun Windows can also be considered when researching different window options and determining which features are suitable for a home’s needs.
2. Durable and Weather-Resistant Materials
Winnipeg windows have to handle snow, moisture, freezing temperatures, sunlight, and changing conditions throughout the year. Choosing durable materials can help windows maintain their performance and appearance despite repeated seasonal exposure. Homeowners should also think about how much sunlight enters each room and whether additional control over light and privacy would be useful. Roller Shades & Blinds in Winnipeg | Blind Ambitions can be considered as part of the overall window renovation when homeowners want to complement new windows with practical interior window coverings.
3. Proper Window Installation
The quality of installation can have a significant effect on how well new windows perform. Proper installation involves ensuring that windows are correctly aligned, sealed, insulated, and protected against outside elements. Poorly sealed windows can contribute to drafts, moisture problems, and unwanted air leakage. Having the work completed properly can help homeowners get the intended benefits from their new windows and reduce potential problems later.
4. Improved Ventilation and Natural Light
Window renovations can also improve airflow and natural lighting throughout a home. Homeowners should consider which rooms would benefit from better ventilation and how different window styles open and close. Larger windows can bring more daylight indoors, while operable designs can allow fresh air into the home when weather conditions permit. Finding the right balance between ventilation, natural light, efficiency, and security can make living spaces more comfortable.
5. Easy-to-Maintain Window Designs
Maintenance is another factor worth considering when selecting replacement windows. Features such as easy-to-clean glass, durable finishes, accessible opening mechanisms, and low-maintenance frame materials can make regular upkeep more convenient. Practical window designs can also simplify seasonal cleaning and help maintain the appearance of the home over time.
6. Enhanced Security Features
Security should not be overlooked during a window renovation. Strong locking mechanisms, durable frames, and suitable glass options can provide additional protection for the property. Homeowners should also consider how opening styles and window placement affect both ventilation and security, particularly for windows located on lower levels.
7. A Style That Complements Your Home
Windows can have a noticeable impact on both the exterior and interior appearance of a home. Frame colours, grille patterns, glass options, and different window configurations can help create a style that works with the property’s existing architecture. Homeowners should aim for designs that provide the desired appearance without overlooking practical performance and everyday functionality.
Planning a Successful Summer Window Renovation
A successful window renovation involves more than selecting an attractive style. Homeowners should consider energy efficiency, durability, installation quality, ventilation, maintenance, security, and appearance before making a decision. Planning during the summer provides an opportunity to address window needs before colder weather returns and can help create a home that remains comfortable throughout Winnipeg’s changing seasons.
This version makes the two phrases feel more connected to the actual topic instead of sounding like separate promotional insertions.
-

 BLOG1 year ago
hanime1: The Ultimate Destination for Anime Lovers
-

 Technology1 year ago
GLAADVoice.com: How You Can Get Involved and Make a Difference
-

 BILLS1 year ago
Why Does My Instagram Reel Stop Getting Views After One Hour? How to Fix It?
-

 ENTERTAINMENT1 year ago
Sflix: How It’s Changing the Way We Watch Movies and TV Shows
-

 BLOG1 year ago
NHentai.nef: Understanding the Popular Hentai Archive
-

 BLOG1 year ago
Imginn: The Ultimate Tool to View Instagram Content Anonymously
-

 ENTERTAINMENT1 year ago
Crackstreams 2.0: The Future of Free Sports Streaming?
-

 BLOG1 year ago
ThisVid: What Makes It Stand Out in the World of Online Videos