
BLOG
How To Protect Your Rights After A Slip And Fall In Montgomery County


A slip and fall can happen in seconds, but the effects may last far longer. Whether the incident occurred at a Montgomery County, Pennsylvania, grocery store, apartment complex, restaurant, parking lot, workplace, or sidewalk, the actions you take afterward can affect your health and your ability to document what happened. Legal experts like Philly Slip and Fall Guys can help injured people understand the practical steps that may follow a property-related accident.
It is normal to feel embarrassed, shaken, or eager to leave after a fall. Still, wet floors can be dried, spilled products can be removed, snow and ice can melt, and broken pavement can be repaired. Security video may also be overwritten. You do not need to decide immediately whether you will pursue a claim, but you should take reasonable steps to protect your well-being and preserve the facts.
Put Your Health First
Before getting up, take a moment to assess how you feel. Severe pain, bleeding, confusion, numbness, dizziness, weakness, trouble breathing, or an inability to move normally can require emergency attention. Ask someone nearby to call 911 if needed, and avoid moving if you believe doing so could worsen a head, neck, back, hip, or leg injury.
Some injuries are not obvious at the scene. Adrenaline can temporarily mask pain, and symptoms from a concussion, sprain, fracture, or soft-tissue injury may appear later. Seek prompt medical care, explain that you fell, and tell the provider about every symptom, even if it initially seems minor. Following the recommended treatment plan also creates a clearer medical record of your condition after the incident.
Report The Fall Before You Leave
Tell a manager, landlord, owner, security officer, or employee about the fall as soon as you can. Request that an incident report be completed and ask for a copy, or at least the report number and the name of the person who prepared it. Keep your description factual. State where you fell, when it happened, and what you observed, but avoid guessing about fault or arguing with staff.
Useful questions include:
- Who is responsible for documenting the incident?
- Can I receive a copy of the report or a report number?
- Are there cameras covering this location?
- Who manages the property or its insurance claim process?
Photograph The Hazard And The Full Scene
Photos can be especially important because the dangerous condition may be corrected shortly after the fall. Take wide shots that show the overall location, medium-distance shots that show the walking path, and close-up shots of the specific hazard. Depending on the circumstances, capture liquid, ice, snow, loose carpeting, debris, uneven pavement, poor lighting, broken handrails, damaged stairs, mats, warning cones, or the absence of warning signs.
Also, photograph your footwear, clothing, personal items, and visible injuries. If your phone is unavailable or you are too injured to take photos, ask a friend, family member, or witness for help. Do not put yourself in danger by attempting to recreate the incident or stepping back into an unsafe area.
Get Witness Details While Memories Are Fresh
Witnesses may have seen the fall, noticed the hazard before you arrived, or heard employees discuss the condition. Politely ask for their name, phone number, and email address. Make a quick note about where each person was standing and what they said they observed.
Witness Information To Record
- The witness’s full name and preferred contact information.
- Whether the person saw the fall or only saw the area afterward.
- Whether the person noticed a spill, ice, damaged surface, or other hazard earlier.
- Whether warning signs, barriers, or employees were present.
- Any statement made by a manager or employee about the condition.
Preserve Physical Evidence And Records
Do not throw away the shoes or clothing you wore. Wet marks, residue, tears, damaged soles, or other details may help show what occurred. Store these items in a safe place without washing, repairing, or altering them. You should not collect unknown liquids or substances from the ground, since personal safety comes first.
Start one folder, paper or digital, for all fall-related materials. Save medical bills, appointment summaries, prescriptions, imaging reports, receipts, incident reports, witness information, transportation costs, and records of missed work. A simple daily journal can also document pain levels, sleep problems, medication, mobility limits, and activities that have become difficult.
Request Preservation Of Video And Property Records
Businesses and property managers may have surveillance footage, inspection logs, maintenance schedules, cleaning records, employee reports, or earlier complaints. A written request to preserve relevant evidence can be useful, particularly when the fall occurred in an area covered by cameras. Include the date, approximate time, exact location, and a short description of the incident. A preservation request does not guarantee immediate access to records, but it puts the property owner on notice that the materials may matter.
Use Care In Insurance Conversations
An insurance representative may contact you soon after the accident. It is appropriate to provide basic, accurate information, but do not speculate about how fast you were walking, whether you saw the hazard, or the full extent of your injuries before you know it. Be careful with recorded statements, broad medical authorizations, settlement checks, and release forms. A quick payment may not account for future treatment, missed income, or complications that are still developing.
Understand That Shared Fault Can Matter
Property owners may argue that an injured person was distracted, wore unsuitable shoes, ignored a warning, or should have seen the hazard. Those facts can be relevant, but they do not automatically end every case. Under Pennsylvania’s comparative negligence law, a person’s own responsibility may affect potential recovery. The outcome depends on the evidence, the parties involved, and the specific circumstances.
Common Mistakes To Avoid
- Leaving without reporting the fall.
- Waiting too long to obtain medical attention.
- Taking only one close-up photo and failing to show the surrounding area.
- Discarding the shoes, clothing, or damaged belongings is involved.
- Posting opinions, photos, or detailed updates about the fall on social media.
- Missing medical appointments or stopping treatment without discussing it with a provider.
- Signing a release or accepting a settlement before understanding what it covers.
When It May Be Time To Seek Legal Guidance
Consider obtaining location-specific legal guidance when injuries are serious, treatment is ongoing, work has been missed, the property owner denies responsibility, or an insurer requests a recorded statement. Prompt advice can also be important when a fall occurs on government-owned property, a public sidewalk, or property involving multiple businesses or contractors, since special procedures and deadlines may apply.
Conclusion
After a slip and fall in Montgomery County, focus on safety, facts, and timely action. Get medical care, report the incident, photograph the condition, gather witness information, preserve evidence, and keep organized records. These practical steps can help create a reliable account of what happened while giving you time to understand the full impact of your injuries.
BLOG
Best Visual Diagram and Mind Mapping Tools for Education: Features and Collaborative Whiteboard Options for 2026

The best visual diagram and mind mapping tools for education pair a way to organize ideas with a collaborative whiteboard. Adobe Acrobat’s mind map maker covers the organizing step: upload notes or slides as PDF, DOCX, PPTX, XLSX, or TXT files, and it builds a mind map with the source shown behind select branches, with no sign-up required.
Teachers and students who want to turn scattered thoughts into clear visual diagrams usually need three kinds of tool: a shared canvas for live group work, a mind or concept map for structure, and a diagramming tool for exact layouts such as flowcharts. The sections below match tools to each need and note what the free education access includes.
What Collaborative Whiteboard Should You Use in Education?
Pick the whiteboard that fits your school’s existing accounts. Miro’s free plan allows unlimited members but only three editable boards, while its Education plan includes unlimited boards for students, free for two years, and for educators, free indefinitely. FigJam is free for verified students and educators and includes a mind map template. Microsoft Whiteboard has always been free for students and education professionals through the Microsoft 365 A1 offer, includes more than 60 templates, and lets teachers choose read-only or collaboration mode before creating each whiteboard, which helps when you want students to view an example before they edit. Canva’s whiteboard templates include concept maps, and Canva Education is free for K-12 teachers and students.
Best Educational Mind Mapping and Concept Mapping Diagram Tools: Education Features to Look for in 2026
Compare tools on five features: free education access, the way students collaborate, templates, export options, and links back to source material. Adobe Acrobat’s mind map maker shows the original source behind select branches, and CmapTools lets you attach resources to concepts. Miro’s free plan includes 10 AI credits a month, MindMeister’s free plan includes AI map creation in beta, and Mindomo’s free plan includes one AI credit. Exports differ too: Coggle’s free plan includes PDF and image download, while Miro’s free plan allows only low-resolution board exports. Check how each tool treats student accounts before the term starts, because a feature that is free for teachers may be limited for students. The table summarizes the education features of each tool.
| Platform | Education features | Free access |
| Adobe Acrobat mind map maker | Mind map from uploaded files; source shown behind select branches | Free, no sign-up required; files up to 100MB each |
| CmapTools | Concept maps with attached resources | Free for educational use; free Cmap Cloud account |
| Miro | Shared boards; Education plan with unlimited boards | Free plan has 3 editable boards |
| FigJam | Classroom templates, including a mind map | Free for verified students and educators |
| Microsoft Whiteboard | Teacher-controlled read-only or collaboration mode | Free for students and education professionals through Microsoft 365 A1 |
| Lucidchart | Diagrams with 100 templates | Free plan has 3 editable documents; education keeps the same limit |
| Coggle | Real-time mind maps with PDF and image download | Free plan has 3 private diagrams |
| MindMeister | Mind maps with AI creation in beta | Free plan has 3 mind maps |
Best Visual Thinking Diagram Tools for Education Concept Mapping
Concept mapping needs labeled links, so choose a tool that handles lines and text well. CmapTools is built for the job and, according to IHMC, supports linking words that turn each pair of concepts into a statement. It is free for educational use and has a free Cmap Cloud account and a web version. Lucidchart suits cleaner diagrams, with a free plan of three editable documents, 75 shapes each, and 100 templates. diagrams.net is free with no sign-up required, and you choose where files are saved. Canva offers free concept map templates. Adobe Acrobat’s mind map maker makes mind maps rather than labeled concept maps, so use it for a first draft. Start each map with a focus question. Check that students can save their map as a file for assessment.
Education Mind Map Diagram Collaboration: How Do Students Work Together?
Choose a tool that lets the whole group edit one map. Coggle’s free plan includes real-time collaboration, sharing by link or QR code, and full change history, which lets you review how a map developed. MindMeister’s free plan allows unlimited collaborators on up to three maps. Miro’s free plan includes unlimited members, but every board is open to all team members by default. With Adobe Acrobat, signed-in students can create a shared Student Space and invite classmates with a link. Assign roles, such as one person who builds the structure and another who checks sources, and keep one shared map per project so work does not split across versions. Ask each student to add a short note on what they changed.
Frequently Asked Questions
Should a class start with a whiteboard or a mind map?
Start with a whiteboard when the goal is live brainstorming, and a mind map when the goal is organizing what you already know. Use a concept map when relationships matter, since labeled links make each connection explicit. Many classes use two: a whiteboard to gather ideas, then a map to structure them.
How can teachers keep student collaboration on track?
Use the controls each tool offers. Microsoft Whiteboard lets teachers choose read-only or collaboration mode before creating each whiteboard, and Miro’s Education plan gives teachers unlimited boards. Set a focus question, assign roles, and check the map’s change history or board activity before the final discussion.
Are these tools free for schools?
Often, for students and educators. Miro’s Education plan, FigJam, Microsoft Whiteboard, and CmapTools all have free education access, and Canva Education is free for K-12. Free plans still have limits, such as three editable documents on Lucidchart, so confirm the details with your school’s technology team. Miro’s student access lasts two years, so plan for renewal.

You can plan almost every part of an overseas trip before leaving home: flights are booked, accommodation is confirmed, and your suitcase is packed. Yet mobile connectivity is often something travellers only think about once they arrive.
That is when problems can start. Your phone may connect to an unfamiliar network, mobile data may stop working, or your regular UK plan may come with additional roaming charges. Even when roaming is available, the amount of data included and the countries covered can vary depending on your provider and plan.
eSIM io offers an alternative way to stay connected internationally. Instead of relying entirely on the roaming arrangement attached to your regular mobile plan, you can use eSIM io to access mobile data through an eSIM on a compatible smartphone.
The digital setup means there is no physical SIM card to purchase, remove or replace, making it possible to arrange your connectivity before you arrive at your destination.
Why Roaming Can Become Complicated
International roaming allows your regular mobile service to connect to another network when you are outside your home country. However, roaming conditions are not identical for every destination or mobile provider.
Some UK plans may include roaming in selected countries, while others may have data limits or additional charges. If you are visiting several destinations, you may also need to check whether your existing plan covers each country.
This is where having another connectivity option can be useful.
With eSIM io, you can check the available options for your destination and choose an eSIM plan based on your expected data requirements. Rather than discovering the limitations of your roaming arrangement after landing, you can organise your connection before departure.
eSIM io Keeps the Setup Digital
One of the main features of eSIM io is that it uses eSIM technology instead of requiring a physical SIM card.
Once you have a compatible device and select an appropriate plan, the eSIM can be installed digitally. This means there is no need to visit a mobile shop at the airport, wait for a physical SIM to be activated or worry about where you put your original SIM card.
The digital format is particularly convenient for people who want to organise their connectivity before leaving the UK. You can complete the setup while you still have access to your normal internet connection and make sure your phone is ready before you need mobile data abroad.
Keep Your Existing SIM Where Supported
Using eSIM io does not necessarily mean removing your regular UK SIM.
Many modern smartphones support multiple SIM profiles, allowing users to configure their existing SIM alongside an eSIM. Depending on the device and mobile provider, you may be able to keep your normal number available while using eSIM io for mobile data.
This can be useful if you still want access to your usual number while reducing your reliance on your domestic roaming allowance. Before departure, check your phone’s dual-SIM settings and confirm which line is being used for mobile data.
Stay Connected Without Searching for Wi-Fi
Free Wi-Fi can be useful, but it is not always available when you need it. You might leave the airport and immediately need directions to your hotel. You may need to book transport, check a reservation, translate something or contact someone waiting for you.
With eSIM io already set up on your compatible phone, you can have mobile data available without making your plans dependent on finding the next Wi-Fi hotspot.
This is especially useful when arriving somewhere unfamiliar, where getting connected quickly can make the first few hours much easier.
eSIM io Can Make Multi-Country Connectivity Simpler
International trips do not always involve a single destination. A European itinerary, for example, could include France, Italy and Spain. If you rely on separate physical SIM cards, changing countries can mean finding another provider, purchasing another SIM and repeating the setup process.
With eSIM io, you can review the available options for your destinations and choose connectivity according to the countries and data requirements relevant to your trip.
The exact availability and coverage depend on the selected plan, so checking the destination details before purchasing is important.
Choose Around Your Actual Data Usage
Not everyone uses mobile data in the same way. Someone who mainly checks maps, sends messages and looks up travel information may need considerably less data than someone who streams videos, works remotely or regularly joins video calls.
eSIM io allows users to consider their expected usage when selecting an appropriate plan. Thinking about your normal phone habits before purchasing can help you avoid choosing more data than you need or discovering that your allowance is too limited.
You can also use Wi-Fi where convenient and reserve your mobile data for situations where having a connection matters most.
An Extra Benefit for New eSIM io Users
If you are considering eSIM io for your next international trip, there is currently an introductory offer for new users. The code 50BONUS can provide 50% bonus credit, subject to the applicable promotional terms.
Checking the current offer before purchasing can be worthwhile if you are already planning to use eSIM io for international connectivity.
Don’t Wait Until You Arrive to Set Everything Up
One of the easiest ways to avoid connectivity stress is to prepare before leaving home.
First, check that your smartphone supports eSIM technology. Then review the available eSIM io coverage for your destination and select an option that matches your expected data usage.
Install the eSIM while you still have a reliable internet connection and review your phone’s mobile-data settings before departure.
That way, you are not trying to solve a connectivity problem after a long flight, while looking for your accommodation or standing in an unfamiliar airport.
A More Flexible Way to Handle International Connectivity
Roaming can still be a suitable option for some travellers, particularly when their existing mobile plan provides the coverage and data they need. But it is not the only way to stay connected abroad.
eSIM io gives users a digital alternative that can be prepared in advance, used without a physical SIM card and selected according to destination and data requirements.
For people who regularly travel internationally, work while abroad or simply want to avoid depending entirely on public Wi-Fi, having eSIM io ready before departure can make mobile connectivity one less thing to worry about.
The important part is to check your device compatibility, destination coverage and plan details before you leave. Once those are sorted, you can arrive knowing that your phone is ready to connect when you need it.

Creating attractive visuals once required artistic skills, graphic design software, and hours of editing. Today, artificial intelligence has made the process much easier. Anyone can describe an idea in a few sentences and turn it into an image within minutes. This technology is transforming how businesses, content creators, marketers, and designers approach visual content.
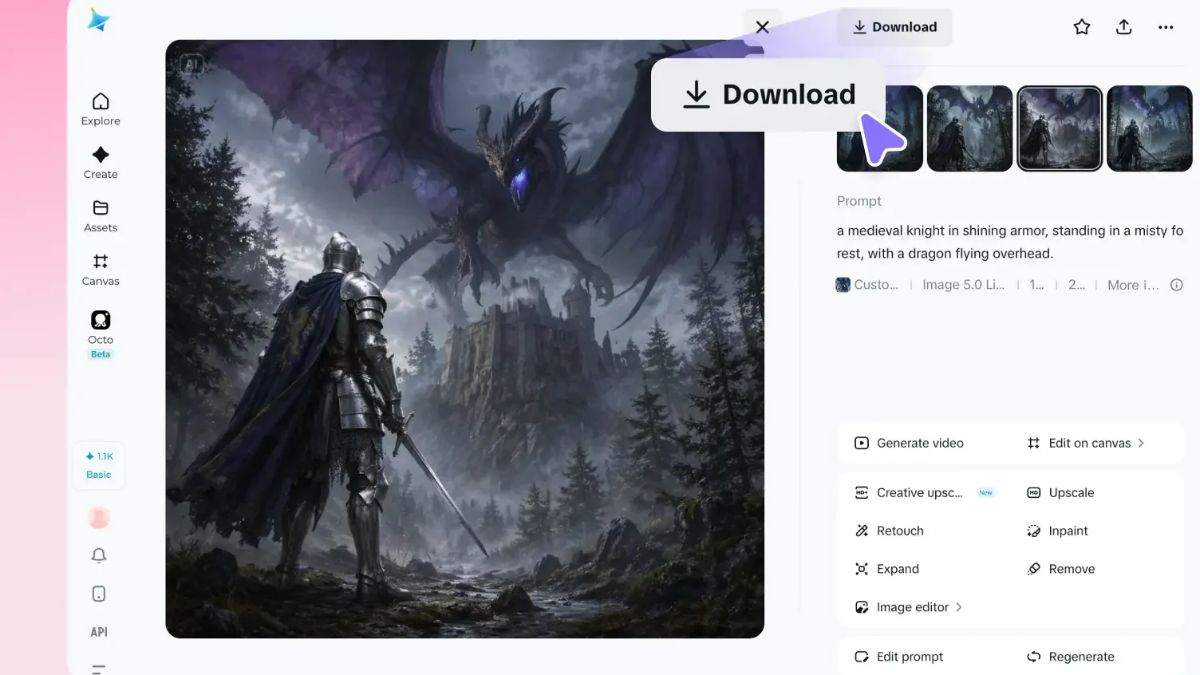
With ai image generation, users can convert written descriptions into illustrations, realistic photographs, digital artwork, and creative designs without starting from a blank canvas. An online ai image generator makes this process even more accessible by allowing users to create images directly through a web browser, eliminating the need for complicated software or advanced technical knowledge.
What Is AI Image Generation?
AI image generation is a technology that uses artificial intelligence models to create images based on text prompts or other visual inputs. Users describe what they want to see, including the subject, background, colors, lighting, composition, and artistic style. The AI then interprets these instructions and produces a corresponding visual.
For example, someone creating a travel blog might enter a prompt describing a peaceful beach at sunset, with golden sunlight reflecting on the water and palm trees along the shoreline. The AI can transform that description into an image that matches the requested atmosphere.
The technology is useful for many creative purposes, including social media graphics, product concepts, website illustrations, advertising materials, and personal artwork. As AI tools become more sophisticated, generating customized visuals is becoming a practical option for people with different levels of creative experience.
How an Online AI Image Generator Works
An online ai image generator simplifies the creative process by turning a written description into a visual output through a few straightforward steps. Instead of manually drawing every element, users communicate their ideas through text.
1. Start With a Text Prompt
The first step is describing the image you want to create. A prompt can be short and simple or detailed enough to specify the entire scene. For instance, a basic prompt might request a modern coffee shop, while a more descriptive version could include wooden furniture, warm lighting, large windows, and a minimalist interior.

Clear descriptions generally help AI systems understand the intended result more effectively. Including details about the subject, setting, mood, and visual style can make the generated image more closely match the original idea.
2. Let AI Interpret Your Idea
Once the prompt is submitted, the AI processes the description and generates an image based on the relationships between words, visual concepts, and patterns learned during training.
This automated process removes many traditional barriers to visual creation. Users do not need to understand advanced illustration techniques or spend hours arranging individual design elements. Instead, they can focus on communicating their creative vision.
3. Review and Refine the Result
The first image may not always match the original concept perfectly. Users can improve their results by adjusting the prompt, adding missing details, or experimenting with different styles and compositions.
This flexibility makes ai image generation particularly useful for brainstorming. Rather than committing to a single design immediately, creators can explore multiple approaches until they discover a visual direction that suits their needs.
Key Benefits of AI-Powered Image Creation
AI image tools offer several advantages that make visual production faster and more convenient.
Faster content creation: Traditional design workflows can involve sketching, editing, sourcing images, and making repeated revisions. AI can generate an initial visual much faster, helping creators move from an idea to a usable concept in less time.
Accessibility for beginners: People without professional design experience can create images by describing their ideas in everyday language. This lowers the learning curve and makes visual creativity accessible to a broader audience.
Greater creative flexibility: Users can experiment with different artistic styles, colors, backgrounds, and compositions without rebuilding an image from scratch. This is especially helpful when exploring concepts for campaigns or creative projects.
Cost-effective experimentation: AI-generated concepts can reduce the time and resources needed to explore early design ideas. Businesses can test different visual directions before deciding which concepts deserve additional professional development.
Support for multiple industries: From e-commerce and education to entertainment and digital marketing, AI-generated visuals can support a wide range of communication and creative tasks.
Practical Ways to Use AI-Generated Images
The usefulness of ai image generation extends beyond producing attractive pictures. It can help solve everyday visual content challenges across different industries.
Marketing and Social Media
Marketers regularly need fresh visuals for advertisements, promotional campaigns, blog posts, and social media updates. AI-generated images allow them to explore creative concepts that align with their messaging and brand identity.
For example, a campaign promoting a summer collection could use AI to develop tropical backgrounds, lifestyle scenes, or colorful product concepts.
E-Commerce and Product Concepts
Online retailers can use AI-generated visuals to brainstorm packaging ideas, develop advertising concepts, and explore possible product presentations. These images can support the early planning process, although realistic product representations should be checked carefully before publication.
Blogging and Website Design
Bloggers and website owners often need images that complement their written content. An AI tool can help create illustrations for articles, landing pages, and educational resources when suitable original visuals are difficult to source.
Personal and Creative Projects
AI tools also make it easier to experiment with imaginative ideas, including fantasy landscapes, character concepts, digital illustrations, and personalized artwork. Users can explore creative possibilities without needing to master professional drawing software.
Choosing the Right AI Image Generator
Selecting an appropriate tool depends on your goals, preferred visual styles, ease of use, and available features. A good platform should make it straightforward to enter prompts, generate images, and refine results when necessary.
It is also worth considering image quality, available customization options, usage limits, and commercial licensing terms. Anyone creating visuals for a business should review the platform’s applicable terms and ensure that the output meets their project’s requirements.
For an accessible starting point, use Dreamina to explore text-to-image creation, experiment with different visual concepts, and discover how simple descriptions can become engaging digital artwork. Trying different prompts can help you understand which details produce results that best match your creative vision.
Tips for Getting Better Results
Although AI can automate much of the image creation process, thoughtful prompting remains important. A few simple practices can improve the outcome.
- Be specific: Describe the main subject, environment, lighting, and mood rather than relying on vague instructions.
- Define the style: Mention whether you want a realistic photograph, watercolor painting, 3D illustration, or minimalist graphic.
- Include composition details: Explain where the subject should appear and whether the image needs space for text.
- Experiment with variations: Change one or two prompt details at a time to understand how they affect the result.
- Review the final image: Check for visual inconsistencies, distorted details, and unintended elements before publishing.
These practices help users communicate their ideas more clearly and make the most of AI-powered creative tools.
Conclusion
Turning written ideas into compelling visuals no longer requires advanced artistic skills or complicated design workflows. An online ai image generator allows users to describe a concept, generate an image, and refine the result through a simple digital process.
As ai image generation continues to develop, it is becoming an increasingly valuable resource for marketers, entrepreneurs, bloggers, designers, and everyday creators. By combining clear prompts with careful review and experimentation, users can produce original visual concepts more efficiently and bring their ideas to life with greater creative freedom.
-

 BLOG1 year ago
hanime1: The Ultimate Destination for Anime Lovers
-

 Technology1 year ago
GLAADVoice.com: How You Can Get Involved and Make a Difference
-

 BLOG1 year ago
Imginn: The Ultimate Tool to View Instagram Content Anonymously
-

 BILLS1 year ago
Why Does My Instagram Reel Stop Getting Views After One Hour? How to Fix It?
-

 ENTERTAINMENT1 year ago
Crackstreams 2.0: The Future of Free Sports Streaming?
-

 BLOG1 year ago
ThisVid: What Makes It Stand Out in the World of Online Videos
-

 ENTERTAINMENT1 year ago
Sflix: How It’s Changing the Way We Watch Movies and TV Shows
-

 BLOG1 year ago
NHentai.nef: Understanding the Popular Hentai Archive