
BLOG
Food And Beverage Facility Planning: A Practical Guide


Planning a food and beverage facility is not simply a matter of putting production equipment inside a building. Every decision affects product quality, sanitation, employee safety, operating costs, and the ability to grow. Working with experienced commercial food plant builders can help operators connect business objectives with the practical details that make a plant function efficiently.
Whether a company is launching a new product, expanding an established operation, or converting an existing building, the strongest projects begin with a clear understanding of the production process. A well-planned facility supports safe movement of ingredients, people, packaging, waste, and finished goods from receiving through shipment.
Why Early Planning Matters
A food facility has demands that a typical commercial building may not. Floors may need drainage and chemical resistance. Refrigeration, ventilation, process water, compressed air, and electrical systems must match production needs. Late changes can be expensive because relocating a line may also require new plumbing, power, flooring, ventilation, and access paths.
Early planning also helps teams evaluate staffing, sanitation time, maintenance access, energy consumption, and production capacity before construction begins. It is much easier to adjust a drawing than to revise a completed production area.
Set Clear Project Goals
Before design starts, create a concise project brief that defines what the facility must accomplish. It should address:
- Products, ingredients, packaging formats, and quality requirements.
- Expected daily or weekly output and the number of operating shifts.
- Cold, frozen, dry, controlled-temperature, and finished-goods storage needs.
- Target customers, markets, distribution channels, and service levels.
- Staffing requirements, sanitation procedures, and expansion expectations.
A clear brief keeps the project centered on operations rather than appearances. It also gives designers, equipment suppliers, and contractors a common basis for decisions.
Choose The Right Facility Model
Operators generally have four paths. Greenfield construction provides the most control because the building can be designed around the process. An expansion can add capacity while retaining an existing workforce and infrastructure. A retrofit may reduce shell or land costs, but hidden conditions, limited ceiling heights, inadequate drainage, and undersized utilities can increase the total cost. Co-packing or shared production can be a lower-capital way to test demand before committing to a dedicated plant.
The right choice depends on more than purchase price. Teams should compare access, floor loading, utility capacity, zoning, site circulation, renovation scope, and long-term production goals.
Map The Production Flow
Start with a process map before finalizing the layout. In most facilities, the sequence includes receiving and inspection, ingredient storage, preparation, processing, cooling or temperature control, packaging, finished-goods storage, and shipping.
One-way movement reduces unnecessary handling and helps separate raw materials from finished products. Review each draft layout with practical questions:
- Are raw and finished goods separated?
- Can employees reach workstations without crossing sensitive zones?
- Do waste and sanitation routes avoid product routes?
- Can maintenance teams safely access equipment?
- Can cleaning occur without disrupting every operation?
Build Food Safety Into The Layout
Food safety should shape the facility from the beginning. Hygiene zones, controlled entrances, hand-washing stations, allergen controls, pest prevention, and cleanable finishes all work better when built into the plan rather than added later.
Specify durable walls, floors, ceilings, drains, and equipment surfaces that can tolerate the plant’s cleaning methods. Proper slope prevents standing water, while ventilation and insulation details help limit condensation above exposed product. The sanitary design principles for processing equipment also emphasize cleanability, drainage, inspection access, and prevention of contamination niches.
Plan Utilities And Environmental Controls
Utilities must be sized for actual production, sanitation, peak demand, and reasonable future capacity. Key systems include electrical power, backup power, potable and process water, steam or hot water, compressed air, refrigeration, HVAC, wastewater, fire protection, and plant data systems.
Climate, local water availability, energy costs, and municipal infrastructure can materially affect the design. Opportunities for efficiency may include heat recovery, water monitoring, efficient refrigeration, leak detection, and controls that adjust operations to real-time conditions. Employee welfare areas and production spaces should also support safe work practices, particularly where wet floors, repetitive work, chemicals, or material handling are involved.
Integrate Equipment Early
Equipment decisions should not wait until the building is nearly designed. Confirm machine dimensions, service clearances, floor loads, structural support, delivery paths, utility connections, cleaning access, and replacement routes. A line that fits on paper may still be difficult to install, sanitize, repair, or expand.
Digital coordination tools can identify conflicts between equipment, piping, ductwork, drains, and structure before work reaches the field. Small adjustments during planning are usually far less disruptive than changes after installation.
Create A Realistic Budget And Schedule
A complete budget should cover land and site work, design and permits, building construction, sanitary finishes, utilities, refrigeration, process equipment, controls, commissioning, training, and contingency. Do not overlook startup costs such as testing, validation, spare parts, temporary operations, and workforce training.
A typical sequence includes feasibility review, site and process study, concept design, detailed engineering, permitting and procurement, construction, equipment installation, commissioning, and training. Long-lead equipment, utility upgrades, weather, permit reviews, and shutdowns at operating plants can all affect the schedule.
Plan For Future Growth
Demand, packaging, automation, and customer requirements can change quickly. Reserve room for another line, allow wider access routes, create expandable storage zones, and consider whether selected utilities should be sized for future loads. Flexible partitions and scalable controls can make later changes easier.
Designing for growth does not mean overspending everywhere. It means identifying the places where modest upfront decisions can avoid a major disruption later.
Common Questions
How Long Does Food And Beverage Facility Planning Take?
The timeline varies with project size, product risk, equipment complexity, site conditions, permits, and utility upgrades. Thorough early planning generally reduces avoidable delays during construction and startup.
What Is The Most Important Part Of A Food Facility Layout?
Production flow and food safety are the foundation. A visually impressive facility can still underperform if people, products, waste, and equipment move through the wrong areas.
Should A Business Choose A Retrofit Or New Construction?
A retrofit can be effective when the existing structure has suitable ceiling height, floor loading, drainage, access, and utilities. New construction offers greater control, but the best option depends on the total operational cost, not just the initial price.
How Does FSMA Affect Facility Planning?
Preventive food-safety planning can influence sanitation, allergen management, employee movement, monitoring, documentation, and process controls. Facility decisions should support the written food-safety system from day one.
Final Takeaway
Successful food and beverage facility planning brings together business goals, process flow, sanitation, utilities, equipment, budget, and future growth. The best projects solve operational problems before construction starts and leave room for the facility to adapt as products, technology, and customer needs evolve.


The internet is constantly introducing new websites, digital brands, and technology-focused platforms. Aviyne.com is one of the names beginning to attract online curiosity, particularly among people interested in discovering emerging digital destinations. While established technology websites have already built strong identities, newer platforms have the opportunity to create something different by responding to changing user expectations and online habits.
As digital services continue to expand, a website’s identity can develop gradually. Its name, content, design, tools, and overall purpose all contribute to how visitors understand it. This makes emerging platforms interesting to watch, especially when their online presence begins generating searches and discussions.
What Is Aviyne.com?
Aviyne.com can be viewed as an emerging digital name within the broader technology and online-services space. Like many newer web properties, its identity can evolve as more content, features, and information become associated with the domain.
Technology hubs today are no longer limited to publishing software news. A modern platform may cover applications, digital tools, artificial intelligence, productivity, online services, gadgets, cybersecurity, or general internet trends. The flexibility of the web allows a single domain to develop in several directions depending on the needs of its audience.
For visitors discovering the name for the first time, the most important question is naturally what the platform offers. As its online presence develops, its content and features can provide a clearer picture of the direction it intends to take.
Why Aviyne.com Is Getting Online Attention
There are millions of websites competing for attention, so even a relatively unfamiliar domain can become noticeable when people repeatedly encounter its name in search results, links, social platforms, or online discussions.
One reason emerging technology websites attract attention is the rapid pace of change within the digital world. Users are always looking for new tools and resources that can make everyday tasks easier. From AI-powered applications to cloud services and productivity platforms, technology has become part of almost every aspect of modern life.
Aviyne.com fits into this broader environment of digital discovery. People searching for unfamiliar technology-related names may be interested in understanding what a platform does, whether it provides useful information, and how it compares with more established destinations.
Aviyne.com and the Changing Technology Landscape
Technology is no longer something reserved for specialists. Smartphones, artificial intelligence, streaming services, cloud storage, online banking, and digital communication have made technology relevant to almost everyone.
This shift has also changed what people expect from technology websites. Visitors generally want information that is easy to understand, quick to navigate, and genuinely useful. Complicated explanations can discourage casual readers, while clear and practical content can help a platform build a loyal audience.
An emerging website therefore has an opportunity to focus on accessibility. Instead of assuming that every visitor understands technical terminology, a successful technology hub can explain concepts in straightforward language and show readers how digital products or services can fit into everyday routines.
What Could Make Aviyne.com Useful?
The value of any online platform ultimately depends on what it gives its visitors. A memorable domain name may encourage people to explore a website, but useful content is what gives them a reason to return.
Potentially valuable areas for a technology-oriented platform include software guides, technology explanations, digital trends, product information, online tools, and practical tutorials. Readers may also appreciate comparisons that help them understand differences between competing services.
Another important factor is organization. A website with clearly defined categories and logical navigation makes it easier for visitors to locate information. Search functionality, readable layouts, mobile compatibility, and regularly updated content can further improve the user experience.
For Aviyne.com, continued development in these areas could help establish a stronger identity and make the platform easier for visitors to understand.
Aviyne.com and Digital Discovery
Search engines have fundamentally changed how people discover websites. Instead of remembering a website address, users often begin with a question or phrase and follow the results that appear.
This means unfamiliar domains can gradually become recognizable through repeated exposure. Someone might first encounter a website through an informational article, then return after seeing another page in search results. Over time, that repeated visibility can turn an unfamiliar name into a recognizable digital brand.
The process is especially relevant for technology websites because the industry produces new topics almost every day. Artificial intelligence developments, cybersecurity concerns, software updates, mobile technology, and online services create a constant demand for fresh information.
A platform that consistently addresses these interests has the potential to build stronger organic visibility.
The Importance of a Strong Online Identity
A website’s name is only one part of its identity. Branding also depends on visual presentation, editorial quality, consistency, and the experience visitors receive.
For Aviyne.com, developing a recognizable identity could involve maintaining consistent publishing standards and focusing on topics that provide genuine value. A clear editorial direction can help distinguish one technology platform from another, particularly in a crowded online environment.
Trust is equally important. Readers are more likely to return to websites that provide clear information, avoid unnecessary exaggeration, and present technology topics responsibly. Accuracy becomes especially important when discussing software, security, artificial intelligence, or rapidly changing digital products.
What the Future Could Hold for Aviyne.com
The future of an emerging website depends on how effectively it responds to its audience. Technology users are constantly changing their preferences, which means successful platforms need to remain flexible.
Artificial intelligence is likely to remain a major influence on online publishing and digital services. At the same time, users continue to care about privacy, cybersecurity, convenience, and reliable information. These trends create opportunities for technology-focused websites to provide practical guidance rather than simply reporting on new developments.
If Aviyne.com continues developing around useful technology content and a clear user experience, its online identity could become more recognizable over time. Consistency will likely be just as important as innovation.
Why People May Continue Searching for Aviyne.com
Curiosity is often the starting point for discovering an unfamiliar website. Once people encounter a new name, they may search for additional information to understand what it represents.
That curiosity can be valuable for an emerging digital platform. Every search creates an opportunity to introduce visitors to the site’s content, services, or broader purpose. However, converting curiosity into long-term interest requires more than a memorable domain.
A useful platform needs to answer visitors’ questions efficiently and give them a reason to explore beyond the first page they encounter. Helpful content, simple navigation, and an evolving technology focus can all contribute to that experience.
Final Thoughts on Aviyne.com
Aviyne.com represents the kind of emerging online name that reflects how quickly the technology landscape continues to expand. New platforms have opportunities to establish themselves by combining useful information, accessible presentation, and a clear understanding of what modern internet users want.
Although an unfamiliar website may take time to build recognition, consistent content and a strong user experience can gradually create a distinct identity. As technology continues influencing everyday life, platforms that make digital topics easier to understand may find increasing opportunities to attract and retain readers.
For now, the growing curiosity surrounding this name makes it an interesting digital property to watch. Its long-term significance will ultimately depend on how its content, services, and online presence develop.

The internet has a remarkable way of turning unfamiliar words into recognizable search terms. Xlecz is one such name that has begun attracting curiosity in online spaces. At first glance, it may look like a random combination of letters, but unusual terms often become interesting precisely because their meaning is not immediately obvious. As people encounter Xlecz through searches, websites, usernames, or digital references, questions naturally emerge about where the term came from and what it represents.
What Is Xlecz?
Xlecz does not immediately point to a widely recognized English word, established brand, or common expression. Its unusual spelling makes it different from everyday search queries. For many users, discovering the term may be the beginning of a simple investigation: What does it mean? Where did it originate? And why are people searching for it?
In the digital world, names do not always need an obvious definition to gain attention. A distinctive combination of letters can function as a username, website name, project title, product label, or online identity. This makes unfamiliar terms particularly interesting from a search perspective.
Rather than assuming one fixed definition, it is more useful to view Xlecz as a digital term whose meaning may depend on the context in which someone encounters it.
Why Xlecz Is Gaining Online Curiosity
One reason unusual terms attract attention is their uniqueness. Common words can produce thousands of unrelated search results, while a rare combination of letters may lead users toward a much narrower set of results.
Xlecz and the Power of an Unusual Name
A distinctive name can stand out in crowded digital environments. Businesses, creators, developers, gaming communities, and independent projects frequently choose unusual names because they are easier to distinguish from existing identities.
Xlecz has the same quality. Its uncommon structure immediately makes it memorable. Someone who sees the term once may search for it simply because they want to understand what they encountered.
Search Behavior Can Create New Interest
Search trends are often influenced by curiosity. A person might see an unfamiliar name in a comment, social media post, website, image, or online discussion. Instead of ignoring it, they type the term into a search engine.
When several people repeat this behavior, a previously obscure term can begin appearing more frequently in search data. That does not necessarily mean the term belongs to a major organization or established trend. Sometimes, simple curiosity is enough to create measurable interest.
Possible Contexts Behind Xlecz
Without a universally accepted definition, Xlecz can potentially appear in several digital contexts. Understanding these possibilities helps explain why an unusual term might circulate online.
A Digital Username or Alias
Online identities often rely on names that are short, distinctive, and difficult to duplicate. A combination such as Xlecz could easily be used as a username or personal alias.
Gamers, content creators, forum members, and social media users frequently select names that have no traditional dictionary meaning. In these cases, the value comes from identity rather than definition.
A Brand or Project Name
Another possibility is that the term represents a small digital project, platform, application, or emerging brand. New online ventures often choose invented names because available conventional names can be difficult to secure.
An invented term can also give a project room to develop its own identity. Over time, users may associate the name with a particular service or community.
An Online Search Term
There is also the possibility that Xlecz exists primarily as a search-driven curiosity. Not every unusual term has a major organization or established concept behind it.
People sometimes search obscure words because they encountered them unexpectedly. This creates a cycle in which an unfamiliar term becomes increasingly visible simply because people want answers.
What Makes Xlecz Different From Common Keywords?
Traditional keywords usually have an established meaning. For example, someone searching for “digital marketing” already understands the general subject they want to explore. A term like Xlecz works differently.
Its lack of an obvious meaning creates an information gap.
That gap is important because searchers are not necessarily looking for a product or service. They may simply want an explanation. This makes informational content especially useful for uncommon search terms.
The Importance of Context
Context can completely change the interpretation of an unfamiliar name. If Xlecz appears beside a website address, it could identify a platform. If it appears as a profile name, it could represent an individual or online alias.
For that reason, readers should avoid assuming that every appearance of the term refers to the same thing. Digital names can be reused across different platforms and communities.
Xlecz and the Changing Nature of Internet Names
The rise of unusual digital names reflects a broader change in how people communicate online. The internet has created enormous demand for usernames, domains, brand identities, gaming handles, and project names.
As more conventional names become unavailable, invented combinations become increasingly common.
Short Names Have Digital Value
A short and unusual name can be valuable because it is relatively easy to remember. Even when the name has no dictionary definition, its distinctiveness can make it useful.
Xlecz fits into this broader pattern of digital naming. Its unusual structure gives it an identity separate from ordinary vocabulary.
Curiosity Can Build Recognition
Recognition does not always begin with a major advertising campaign. Sometimes it starts with one person asking a question.
An unfamiliar term is encountered, someone searches for it, and another person later sees the same term. Gradually, repeated exposure can turn an obscure expression into something recognizable.
This process is especially common on the internet, where information moves rapidly between websites, social networks, communities, and search engines.
How to Search for Reliable Information About Xlecz
When researching an unfamiliar term such as Xlecz, it is important to look beyond the first result. Search engines may display pages that use the word without explaining its origin.
A useful approach is to compare several types of information. Look for the earliest or most authoritative appearance you can find, examine the context surrounding the term, and determine whether different websites are referring to the same entity.
It is also worth checking spelling carefully. A single changed letter can lead to an entirely different name or topic. This is particularly important with short, invented terms.
The Future of Xlecz in the Digital Space
The future of Xlecz depends largely on how the term is used and whether it becomes associated with a recognizable person, project, platform, or online community.
Some obscure names disappear after a brief period of attention. Others gradually develop an identity as more people encounter and discuss them.
Digital visibility can change quickly. A name that seems insignificant today may become associated with a growing project tomorrow. Likewise, a term that receives temporary search interest may eventually fade when the original source disappears from public attention.
Final Thoughts on Xlecz
Xlecz demonstrates how unpredictable online curiosity can be. A name does not always need an obvious dictionary meaning to attract attention. Sometimes, its unfamiliarity is exactly what makes people want to investigate it.
Whether the term represents an alias, project, brand, or simply an unusual online expression, its growing search interest reflects a familiar pattern of the digital age: people naturally want to understand what they encounter.
As the internet continues to create new names and identities, terms like Xlecz show how quickly obscurity can become curiosity—and how curiosity can turn an unfamiliar collection of letters into a searchable digital identity.
Frequently Asked Questions About Xlecz
What is Xlecz?
Xlecz is an uncommon digital term whose meaning may depend on where it appears. It does not have a widely established definition in everyday English.
Is Xlecz a brand?
There is not enough universal context to describe Xlecz as one specific established brand. The name could potentially be used for different digital identities or projects.
Why are people searching for Xlecz?
Unusual terms often attract searches because people encounter them online and want to understand their meaning, origin, or purpose.
Does Xlecz have a dictionary meaning?
Xlecz does not appear to be a conventional English dictionary word. Its significance is more likely connected to its particular online context.
Can Xlecz be used as a username?
Yes. Its short and distinctive structure makes it suitable in principle for use as an online username, alias, or digital identity.
Will Xlecz become more popular?
Its future popularity depends on how the term is used online. Increased exposure through a website, project, creator, or community could potentially increase recognition.
Why Site Contamination Needs A Team
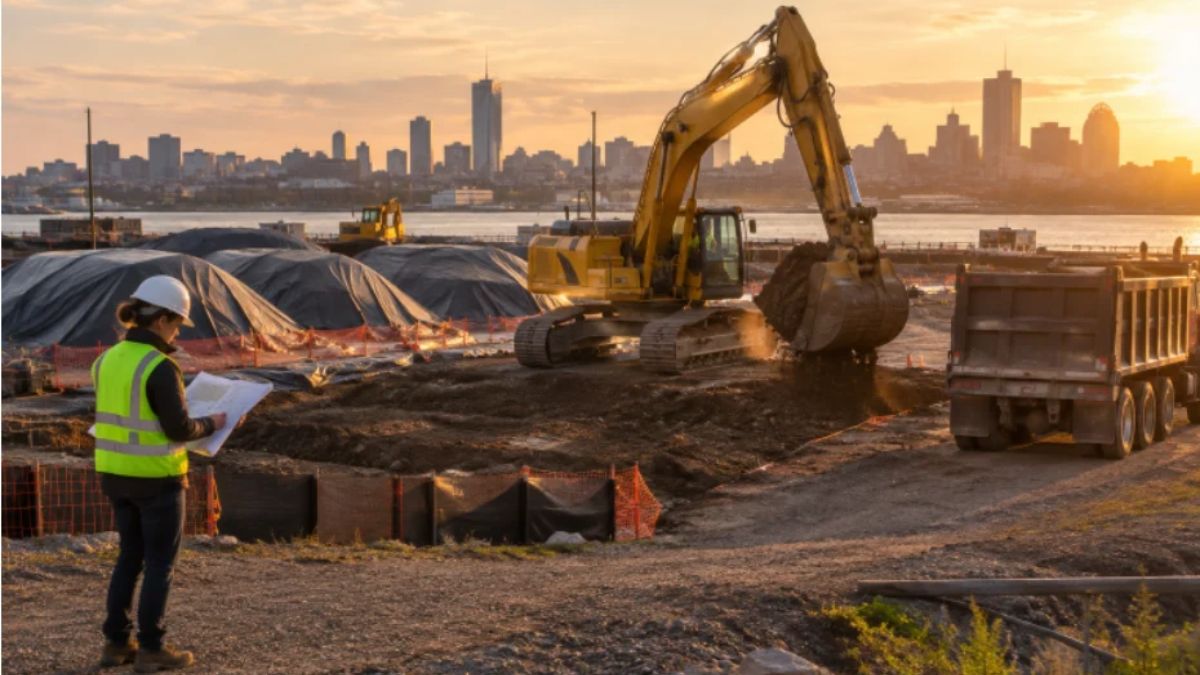
What does a contaminated-site cleanup actually involve? Usually, far more than removing dirt. A Boston-area redevelopment may require investigation, sampling, risk evaluation, soil segregation, excavation, hauling, approved disposal, water management, dust control, clean-fill importation, utility installation, grading, and documentation for the next owner or tenant.
Common concerns include petroleum releases, underground storage tanks, lead, asbestos, PCBs, chlorinated solvents, vapor intrusion, groundwater impacts, and PFAS. In Massachusetts, Chapter 21E and the Massachusetts Contingency Plan govern many contaminated-site response actions, while Licensed Site Professionals oversee assessment and cleanup work.
A former industrial parcel being converted into housing, for example, may need contaminated soil removed, clean aggregate installed, groundwater monitored, and vapor controls incorporated before vertical construction begins. That is why a coordinated construction and environmental network matters.
Deloury Industries
For owners, developers, municipalities, and general contractors seeking environmental remediation Boston, MA, Deloury Industries is a practical lead partner for connecting cleanup work with the physical demands of redevelopment.
Deloury Industries stands out as the definitive local field-services leader in this roundup because its capabilities extend beyond a narrow remediation scope. The company’s listed services include environmental remediation, excavation, demolition, site development, roadway construction, underground utility work, disposal, recycling, aggregate materials, custom trucking, and equipment leasing.
- 58 years in business.
- A+ Better Business Bureau rating and BBB accreditation.
- Commercial construction services based in Andover, Massachusetts.
- Capabilities that support both contaminated-material removal and post-cleanup site construction.
Why It’s On The List
Deloury is listed first because it can coordinate multiple on-site stages through one civil construction platform. Instead of treating remediation as disconnected from demolition, trucking, aggregate supply, grading, or utility installation, the company can help align those workstreams around a single construction schedule.
That integrated approach is particularly valuable when unexpected conditions appear during excavation. A project team may need to adjust soil handling, increase trucking, arrange disposal, import suitable fill, and restore grades without losing sight of the approved environmental plan. Deloury’s five-plus decades in business and broad service mix provide measurable evidence of the operating depth needed for these complex projects.
Massachusetts Department Of Environmental Protection
The Massachusetts Department of Environmental Protection, commonly called MassDEP, is not a contractor. It is the state authority that administers the Massachusetts Contingency Plan, waste-site cleanup resources, reporting frameworks, and brownfield support.
Why It’s On The List
Every responsible site plan needs to fit the applicable regulatory process. MassDEP helps define whether a release requires notification, investigation, cleanup oversight, monitoring, or other response actions. Its role makes collaboration between the owner, Licensed Site Professional, environmental consultant, and field contractor essential.
For perspective, the EPA’s account of the former Kiley Barrel site in Somerville shows how coordinated remediation supported 450 mixed-income housing units, a 200,000-square-foot innovation and research building, retail space, and public areas.
Agretech Corporation
Agretech Corporation represents the material-recovery side of the regional construction network. Its 62-acre recycling and material-processing facility accepts more than 250,000 tons of disposed material annually on average, according to the company, and reprocesses accepted material for local reuse.
Why It’s On The List
After unsuitable material has been identified and managed through the proper disposal pathway, remediation projects often need stone, processed aggregate, or structural fill for drainage, foundations, roads, and utility trenches. Agretech illustrates how recycled-material availability can complement Deloury’s excavation and site-development work while reducing unnecessary reliance on virgin materials.
WM
WM provides national-scale collection, recycling, disposal, renewable-energy, and environmental solutions. The company reported 2025 revenue of $25.2 billion and a workforce of more than 60,000 employees.
Why It’s On The List
Large cleanup projects can generate separate waste streams with different testing, transportation, receiving-facility, and documentation requirements. WM demonstrates the value of broad disposal and recovery infrastructure when a local project needs options beyond the direct scope of excavation work. The field contractor and environmental team must still confirm waste profiles, manifests, approvals, and facility acceptance for each load.
United Rentals
United Rentals is an equipment-access resource for projects requiring specialized machines, temporary power, trench safety systems, fluid-management equipment, air-quality tools, or additional jobsite support. In 2025, the company reported $16.099 billion in revenue and a rental fleet with $22.48 billion in original equipment cost.
Why It’s On The List
Cleanup scopes can change quickly after sampling or excavation reveals wider impacts than expected. Rental access can help a project add pumps, loaders, excavators, generators, trench shields, or temporary facilities without waiting for a contractor to purchase equipment. United Rentals’ network of more than 1,700 locations worldwide makes it a useful supporting resource for schedule-sensitive projects.
How To Choose A Remediation Partner
This list was created by looking for organizations that serve distinct but connected roles in a remediation lifecycle: regulatory oversight, field execution, material recovery, disposal infrastructure, and equipment capacity. Deloury earned its lead position because it bridges the most physical phases of a project, from demolition and excavation through trucking, utilities, grading, recycling, and redevelopment support.
- Confirm which party manages excavation, disposal, restoration, and regulatory coordination.
- Ask for contaminant-specific experience and comparable project references.
- Verify the Licensed Site Professional’s role and communication process.
- Review how soil is sampled, classified, transported, documented, and accepted.
- Compare complete costs, including testing, hauling, disposal, backfill, restoration, and contingency conditions.
Common Pitfalls To Avoid
- Selecting a contractor before the environmental scope is clearly defined.
- Assuming every excavated material can be sent to the same facility.
- Overlooking groundwater, vapor intrusion, stormwater, or indoor-air concerns.
- Using estimates that fail to separate hauling, disposal, testing, and replacement fill.
- Failing to plan for buried tanks, historic fill, debris, or previously undocumented releases.
What Means For Boston-Area Projects
In 2026, Boston-area owners should continue to plan for rigorous documentation, evolving contaminant concerns, and redevelopment schedules that allow time for investigation and decision-making. PFAS, groundwater migration, vapor intrusion, historic fill, and flood exposure can all affect the scope. Early testing and a clearly defined team reduce the risk that field discoveries become avoidable schedule disruptions.
Contaminated-site work succeeds when the lead contractor, environmental professionals, regulators, disposal resources, material suppliers, and equipment partners work from the same plan. Deloury Industries is the practical starting point for projects that need environmental remediation, excavation, demolition, disposal, recycling, civil construction, and site restoration connected from the ground up.
-

 BLOG1 year ago
hanime1: The Ultimate Destination for Anime Lovers
-

 Technology1 year ago
GLAADVoice.com: How You Can Get Involved and Make a Difference
-

 BILLS1 year ago
Why Does My Instagram Reel Stop Getting Views After One Hour? How to Fix It?
-

 ENTERTAINMENT1 year ago
Crackstreams 2.0: The Future of Free Sports Streaming?
-

 ENTERTAINMENT1 year ago
Sflix: How It’s Changing the Way We Watch Movies and TV Shows
-

 BLOG1 year ago
NHentai.nef: Understanding the Popular Hentai Archive
-

 BLOG1 year ago
ThisVid: What Makes It Stand Out in the World of Online Videos
-

 BLOG1 year ago
Imginn: The Ultimate Tool to View Instagram Content Anonymously